

The Appointment module allows you to manage two types of reservations:
- Appointments - any reservation associated with a time slot.
- Events - any reservation not associated with a time slot, for example, a phone call, a lunch-and-learn, a meeting between the institution’s stakeholders, etc.
This article is divided into two sections:
Book an appointment or an event
You can assign an appointment to a patient from two different places in the EMR:
- From the Appointment module, in Display schedule details mode or Search availabilities mode
- From the Administrative center, by clicking on the calendar icon at the top right, which brings you to the Appointment module with the patient already selected.
1. From the Appointment module
When an appointment is booked from a time slot with a defined activity, the activity type, the duration and the appointment type will already be associated to the appointment. It is possible to change any of this fields.
- Select the desired calendar. Your own agenda will be selected by default.
- Select the desired availability. You can either use the Display schedule details mode and click directly on an availability or use the Search availabilities mode and click on one of the list’s availabilities. The main advantage of the Availabilities mode is the ability to bring you directly to the following day containing availabilities, without having to look for them yourself in the calendar.
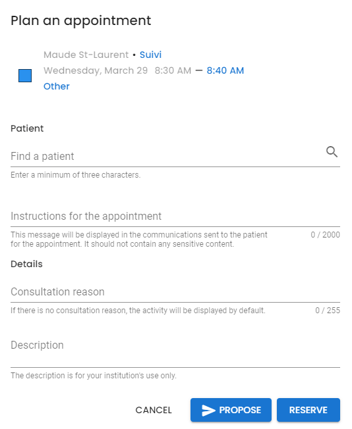
- Complete the information in the event creation menu that appears. From this menu you can:
- Modify the activity associated with the appointment ⚠️ The selection of an activity is mandatory in order to be able to send appointment communications.
- Modify the end time of the appointment
- Modify the type of appointment (in person, online, home visit, telephone or other) if needed
- Search for and associate a patient with the appointment
- Select the mode(s) of communication to use for sending automated patient appointment communications
- For Other type appointments, add or modify instructions for the appointment. These instructions will be displayed in the appointment communications sent to the patient. Note that the instructions must not contain any sensitive content since the communication is not double authenticated.
- Add a note to the patient (optional). This note will be displayed in the appointment communications sent to the patient. Note that this note must not contain any sensitive content since the communication is not subject to double authentication.
-
- Document the consultation reason (optional). This information will be displayed in the patient communications and in the agenda. If there is no consultation reason, the activity will be displayed by default in the agenda, but will not be displayed in the patient communications.
- Add a description (optional)
-
- Select automated communications (booking notice, reminder) to send to the patient.
When the booking window is displayed, the selected availability is "locked". The lock is a mechanism that allows, in real-time, to indicate to other users that availability is currently being reserved in order to avoid overbooking. A locked availability is grayed out and displays the Locked status preceded by the lock icon, regardless of the view or mode a user is in.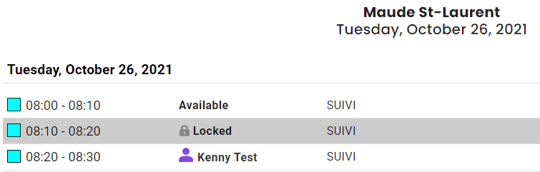
The lock expires after 5 minutes to prevent a time slot from being inadvertently locked for an extended period of time.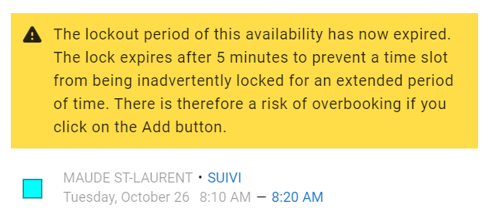
- Select automated communications (booking notice, reminder) to send to the patient.
-
- Once you’ve entered all the required information, you simply need to click on Reserve in order to save the appointment in the desired calendar.
2. From the Administrative center
- When the patient arrives or calls, validate his information.
- Check when are his next appointments (View the patient's appointments).
- Click on the calendar icon in the upper right corner of the Administrative center, in order to give him a new appointment.

By clicking on this icon, you'll be redirected to the Search availabilities mode in the Appointment module. Your patient will already be selected, you'll only have to pick an availability.
Book an appointment with temporary contact info
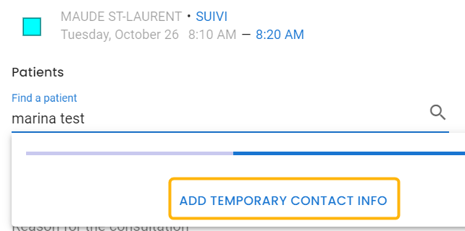
In the event that the person you wish to assign an appointment to does not have a record in Omnimed, you have the option of adding temporary contact info in order to book an appointment quickly. This answers a need expressed by walk-in clinics that need to manage a large number of registrations in a short amount of time when they open their doors every day.
- To do so, search for your patient, and at the bottom of the results.
- Click on Add temporary contact info. This will allow you to book the availability before it is booked for another patient.
-
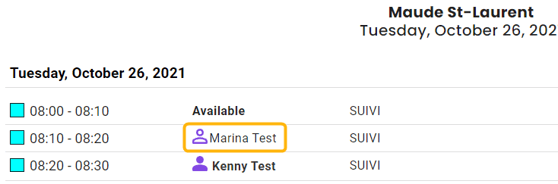
- A patient with temporary contact info is identified by the empty-colored patient icon, rather than the habitual patient icon, full-colored, in the calendar.
-
- At a later time, after booking the availability or once the patient comes in for his/her appointment, you can create the patient record.
- Finally, you'll be able to modify the appointment and remove the temporary contact info and add the right patient.
Related articles
Confirm the patient's appointment by email or SMS