

Since appointment management processes vary from one clinic to another, we offer the opportunity to monitor the progress of appointments, from appointment booking to invoicing, through appointment statuses that can be fully customized by the clinic. These statuses, which are complementary to appointment activities, allow you to add relevant information to each appointment directly from the Agenda view. For example, you could use appointment statuses in the following contexts:
- Checklist at the patient's arrival (e. g. "Form to be completed", "Urine sample")
- Patient location in addition to the waiting room (e.g., "triage room", "examination room A", "surgical room")
- Phone confirmation of the appointment (e. g. "Confirmed appointment", "voicemail")
- Status of the note (e. g. "Note completed", "To be completed")
- Invoice statement (e. g. "Invoiced").
Preliminary configurations
- Like appointment activities, appointment statuses must be configured in the Appointment statuses management module by the owner of your clinic's administrator account.
- It is possible to configure distinct statuses per appointment activity from the Appointment activities management module.
Assigning a status to an appointment
From the Agenda view of the Appointment module, click to the right of an appointment activity to choose a status from the drop-down menu.
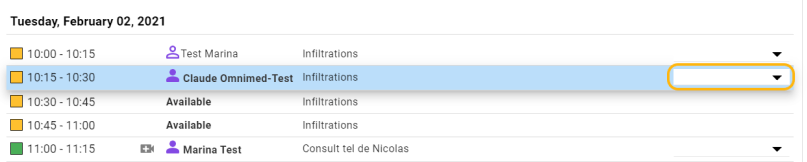
From the Day view of the Appointment module, click to the right of an appointment to choose a status from the drop-down menu.

ℹ️ Please note
- Status cannot be added to an availability. It is only possible to assign a status to an appointment, i.e. when a patient is assigned to the time slot.
- Only one status can be assigned at a time.
- The statuses are displayed in alphabetical order. You can use numbering in front of each status to order them.
- The appointment status may vary according to the activity selected depending on the configuration implemented by your clinic.
- If no activity is selected, only the statuses identified as "default" in the administrator account are displayed.
View the statuses
The statuses are displayed in the Agenda view of the Appointment module and in the Appointment section of the patient's Administrative center.
Modify a status
Click on the status and select another status from the drop-down menu. You can select the first white space to remove any status associated with the appointment.