Our electronic medical record not only allows to fill out new blank clinical notes, but also to create structured follow-ups using standardized tools. Pregnancy monitoring is a good example as this process is well-established and standardized all across the province of Quebec. Thus, you can fill out the obstetrical forms directly in your clinical note and print it on the Ministry of Health and Social Services' official forms.
Document the first visit
Some of the greatest benefits of using our tools are in the pre-population of redundant answers from one form to another or from a pregnancy to another (eg the DLMP and EDC), the automatic integration of electronically received results, and the calculation of certain data (number of pregnancy weeks and weight gain).
⚠️ For each pregnancy, make sure to complete a new version of the four forms (1, 2, 3, 4). It is important not to reuse forms entered during a previous pregnancy.
In order to complete the various forms in the obstetrical file, you must follow the "regular" process of adding a clinical tool to the note. Forms can be easily found using the following terms: "obstetrical", "obs", or "pregnancy".
We recommend that you always open one form at a time, as this will save you from having to re-enter certain answers since they will be pre-populated from the last recorded entry. For example, the patient's weight before pregnancy entered in the form will automatically appear in forms 2 and 4 if form 1 has been previously saved.
Fields that are pre-populated with the last saved data are DLMP, the total number of previous pregnancies (gravida, term, premature, abortion, and living children), height, weight before pregnancy, pregnancy particularities, sex of the fetus, delivery doctor, spouse's name, occupation, smoker, father's type and Rh factor, mother's type and Rh factor.
Document previous pregnancies
Each previous pregnancy must be documented in its own Obstetrical record – Previous pregnancy form.
Tip! If you need to document multiple previous pregnancies for the first time, you can click on the Document a previous pregnancy button as many times as there are pregnancies to document to avoid having to scroll back up to open another one. These forms will be used to fill out the Previous Pregnancies section of Form 1.
Document examinations and discussion topics
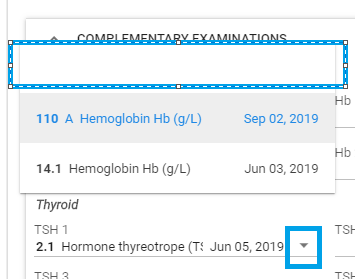
When you first open form 3, you'll see the most recent result found in the patient record Results box for each of the requested tests (hemoglobin, thyroid, and glycemia) will be displayed.
The same result will be displayed several times (eg TSH1, TSH2, TSH3) since we'll always look for the last received/entered result. You'll have to delete the duplicates by clicking on the small arrow next to the unwanted result and emptying the field by selecting the blank row.

Document subsequent visits
In order to efficiently use our obstetrical file tools, some things must be understood:
⚠️ Particularities of the process
Forms 1,2,3 should only be filled out once per pregnancy. A new form 4 must be filled out for each visit.
If you need to make modifications or add information to one of these forms because you have new information to add, you should modify the form through the Clinical tools summary box. The tool will then open in a new note or in your current note. It will allow you to document the consultation reason or the clinical process leading to the change.
Minor changes (such as typos or errors of inattention) can be made through the original note where the tool was filled. This will avoid creating a new note.
Update results in form 3
To add results in form 3, always go through the Clinical tools module, click on the form, and then click Edit to open it in a new note. We recommend that you go through the Clinical tools module instead of modifying the note where it was first completed since generally the addition of results is part of a new visit. It will also allow you to add a form 4 to the same note.
When modifying the form, you'll be able to add a new result by clicking again on the small arrow beside No data available, which will allow you to get the results associated with the result.

Document a new prenatal visit
A new form 4 must be completed for each new visit. Each entry corresponds to a new prenatal visit on the paper form.
By opening form 4, an overview of the form containing all previous visits will be displayed, allowing you to access all information related to the evolution of the pregnancy at the same time as you are documenting the new visit.
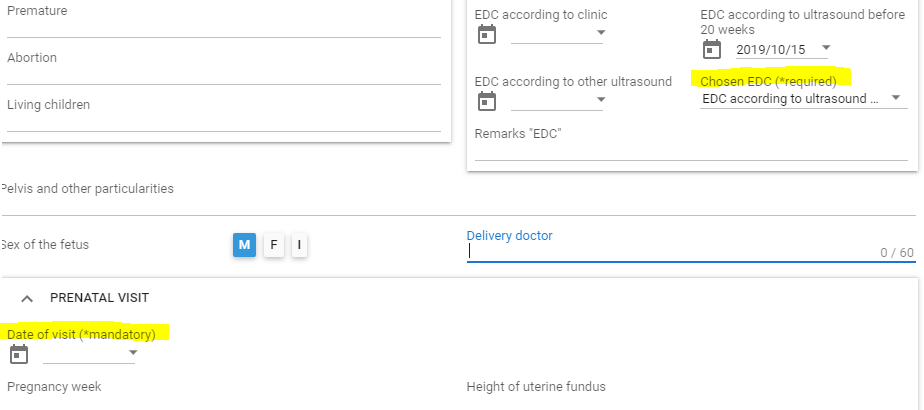
Please note that in order for the preview, printing and calculation of the number of weeks of pregnancy to work, the Chosen EDC and Date of visits must be completed.
For each visit, the Treatment or remarks field on the printed form will be filled with the content of the note's conclusion. Therefore, if you modify form 4 in a new clinical note, this field will be filled by all the information typed in the conclusions of each note where the tool has been modified.
View and print the obstetrical file
You can view the obstetrical file forms in their standardized format by using the printing option:
- If you are modifying one of the forms or are filling out a new form 4, once the note has been saved, you can click on the printer next to the title of the tool to see the print preview.
- From the Clinical tools module, simply select forms 1, 2, 3, and the last form 4 linked to the pregnancy and click on the printer.
Important: Do not select all previous pregnancy forms, nor all forms 4 as it will make you print unnecessary paper.
- The printed form contains all forms 4 completed within 9 months preceding the expected date of delivery selected by the physician and 1 month after that date.
Document a new pregnancy
If the patient has already been followed for an earlier pregnancy in a clinic using Omnimed, you will find that by opening the tools of the obstetrical file, some answers will already be pre-populated. These are the answers related to old pregnancy.
You will need to erase all irrelevant data and replace it with the current pregnancy.
A button has been added at the beginning of each form to allow you to delete any data that may come from a previous pregnancy.
- In the case of form 1, two buttons have been integrated, one of which allows you to keep the data on the spouse. Past medical history and family history will never be removed. You can update these sections manually.- In form 4, two buttons have also been integrated. One of them will allow you to keep the data that comes from form 1 and 2 (D.D.M and weight before pregnancy). The other button will clear everything except the contents of the previous pregnancies box which you can adjust as needed.
