

Schedule templates are previously saved time slots to speed up the creation of schedules with preset templates.
Create a template
Apply a template
Modify a template
Delete a template
Create a template
From the Manage schedule
- Create time slots to be included in the template.
- Check the time slots to be included in the template or click on the Select all icon. Depending on which view you are using, you can create templates for a day, a week or a month.

💡 Tip: Select the Month view to create a multi-week schedule template!
- Click on the Create a template icon.

- Name the template. It is possible to use the same name more than once.

- Click on the Create button. A validation message at the bottom of the screen confirms the creation of the template.
⚠️ A schedule template is specific to a professional for a given institution. It is not possible to share a schedule template among multiple users. However, all users who work in the same calendar will have access to the templates for this professional.
⚠️ If your template must contain time slots available online, make sure to create it from time slots already available online or create new ones. Recurring time slots cannot be displayed online at the moment.
Apply a template
- Display the first day to apply the template.
- Click on the arrow next to the date.

Select the desired template from the template list. The number of days to the right of each model represents the number of days in the template.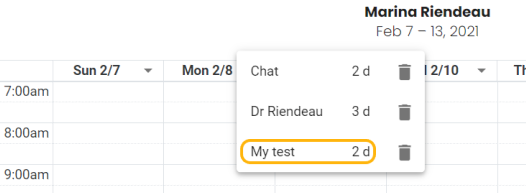
⚠️ Overlapping time slots: It is possible to apply a model even if it overlaps pre-existing time slots.
Modify a template
To modify an existing template:
- Apply the template to be modified then delete it.
- Modify the time slots.
- Select the time slots then create a new template.
Delete a template
To delete a template:
- Access the list of templates (arrow next to the date).
-
Click on the bin icon to the right of the template you want to delete.

-
Confirm the deletion by clicking on the Delete button. The deletion is irreversible.
