It happens every day that your team has to juggle the schedules of stakeholders by moving or canceling appointments. These two actions can be performed individually on each appointment from the appointment window.
Move an appointment
Display cancelled appointments
Move an appointment
Whether it is because the patient can no longer attend their appointment or the caregiver cancels his/her time slot, it is better to move the appointment rather than cancel it and create a new one. This allows you to keep all the information already documented and avoid documenting a cancellation in the patient's file.- Click on the appointment to access its details windows.
- Click on the Move this appointment button to be redirected towards the view displaying the calendar’s availabilities.

- A summary of the appointment details is displayed in a box that also gives you the choice of viewing all of the appointment details or to cancel the move.

To move the appointment from one calendar to another: On the left, below the calendar, select the new person by selecting the box next to the person's name.
- To move the appointment, click on the desired time slot. Please note that by moving the latter, you'll also have the option of deleting the original availability.

- Click on the button Move.
ℹ️ Appointment that overlaps several availabilities
If you modify the length of an appointment or move it, all the available time slots affected by the new date and time of the appointment will be booked by default. If you only wish to book the selected availability, instead of all the affected availabilities, make sure to check the box to this effect in the appointment's move window or the modification window.

Cancel an appointment
You can use the cancel appointment button when the patient no longer needs their appointment or it needs to be moved and you want to document a cancellation in the patient file.
It is possible to cancel an appointment and document the reason for the cancellation, the time of the cancellation and whether the cancellation came from the patient.
- Click on the appointment to access its details windows.
- Click on the Cancel appointment button.

- Record the cancellation:
- Record the date and time of the cancellation. This allows, for example, to document the actual date and time of the cancellation if the patient leaves a voicemail message outside of business hours.
- Indicate whether the cancellation comes from the patient or the clinic. The box is checked by default to indicate that the appointment has been cancelled by the patient.
- Document the reason for cancellation.
- In order not to keep a record of the appointment, slide the Remove availability switch to the right.

- Release availability: If the appointment was booked from a time slot (as opposed to an event), the availability behind the appointment will be kept by default and can be reserved for another patient. To remove the availability slot, please slide the switch to the right.

View cancelled appointments
View cancelled appointments in the Agenda
Cancelled appointments are displayed in the Agenda view of the Appointment module when the Show ancelled events switch is activated (blue).
View the patient's cancelled appointments
Cancelled appointments are kept in the Appointments section of the Administrative Center. Hover your cursor over the Cancelled label to display the number of hours between appointment and the reason for cancellation.
Two indicators display the number of canceled and missed appointments for each patient. The calculation is based on all appointments displayed in the administrative center (a maximum of 50 in the future and 50 in the past) and not on the patient's entire appointment history.
Enable online appointment cancellation by the patient
A configuration allows patients to cancel their appointments from appointment communications (booking notice and reminder). To do this:
- Access the Administration module.
- Click on Manage activities, then Manage communications.

- Activate the switch to allow patients to cancel their appointments. The switch must be placed to the right (blue) for the feature to be activated.

- Select a penalty period (optional). The penalty period indicates the time from which the patient is automatically registered as a no-show for the appointment. The patient can still cancel their appointment beyond this period. In the absence of a penalty period (0 hours), no absence is recorded in the file. The patient is not automatically informed of the penalty period. It is possible to inform them of this in the cancellation policy.
- Write the cancellation policy to be displayed in appointment communications to patients. This policy is mandatory when a penalty period is configured, but optional if no penalty period is configured.

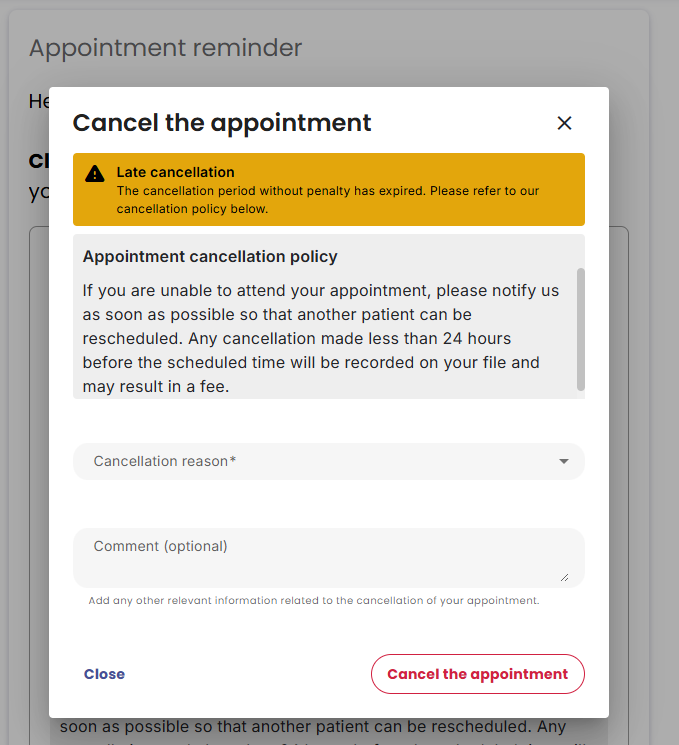
Online patient cancellation process
When the patient cancellation feature is enabled, a Cancel appointment button will appear at the bottom of appointment communications. If the clinic configures a cancellation policy, it will appear below the cancellation button.
To cancel the appointment, the patient must:
1. Click the Cancel appointment button in their booking notification or appointment reminder email.
If the appointment notice or reminder is sent by SMS, the patient must click on the link in th SMS to be able to see the cancellation button on the Web page.

2. Select a reason for cancellation (some choices are available).
3. If needed, the patient can add a comment.