
This article describes the steps to follow to integrate the Quebec Health Record (QHR) viewer in Omnimed. The QHR is a tool that allows physicians and other healthcare providers to access essential information in order to act quickly and to ensure the quality of patient follow-ups.
⚠️ Please note that we are not a Quebec Health Record (Dossier santé Québec). If you do not have a QHR key or if you have questions concerning QHR Production, outside of Omnimed, you must contact their customer service directly.
Preliminary validation: individual vs. group installation
This article is intended for anyone who would like to install it on a workstation individually.
💻 If you also connect from home to your personal Internet, individual installation is required on your computer.
There is also a procedure for network administrators to install using group policy (network). If you use the same computer at the clinic and at home, and your institution has a network administrator, it is highly recommended that the administrator perform the installation using group policy. He will be able to ensure that you can connect remotely securely to the institution's network.
Steps to follow - Individual installation
The solution developed to allow access to QHR from the Omnimed application is made up of two main components: a native application allowing authentication with the QHR USB key and a Chrome extension which acts as a communication intermediary between this native application and the Omnimed web application.
Prequisites
1. Validate the presence of prerequisites in the following article: Prerequisites to access the QHR from the EMR
Install the MSSS DSQ Viewer Kit
2. Download the MSSS DSQ Viewer Kit: VisualiseurDSQMSSS
⚠️ Note that a warning message will appear on your screen. You’ll only be presented with the Do not run option. You must click on Additional information in order to access the Run anyway option. We assure you that the installation is safe, so you can continue.
3. Open the installer, click on the 4 boxes and select Suivant.

4. The installer will offer to restart the computer. This step is essential after installation.
Install the Omnimed DSQ Viewer
5. Download the installer: OmnimedQHRAuthentificator.exe
⚠️ Note that a warning message will appear on your screen. You’ll only be presented with the Do not run option. You must click on Additional information in order to access the Run anyway option. We assure you that the installation is safe, so you can continue.
6. Open the installer and follow the procedure that will be suggested by the installer.
7. The installer will offer to restart the computer. This step is essential after installation.
Install and activate the Chrome extension of the QHR
8. Open the Google Chrome Web browser. A popup window enabling the Chrome extension of the QHR should appear (switch the radio button from grey to blue).
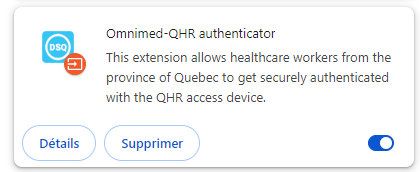
The Omnimed Chrome extension can be added using the direct link if a problem occurs or the extension is deleted: click here for the direct link.
If the Google Chrome popup window does not open, copy and paste the following address (everything in bold) into the address bar of the chrome web chrome://extensions in order to access the list of extensions installed on the computer. Activate the Omnimed-QHR Authenticator extension by checking the appropriate box.
User profile configuration
Troubleshooting
Listof problem-solving validations
Increase of the connection duration to the QHR
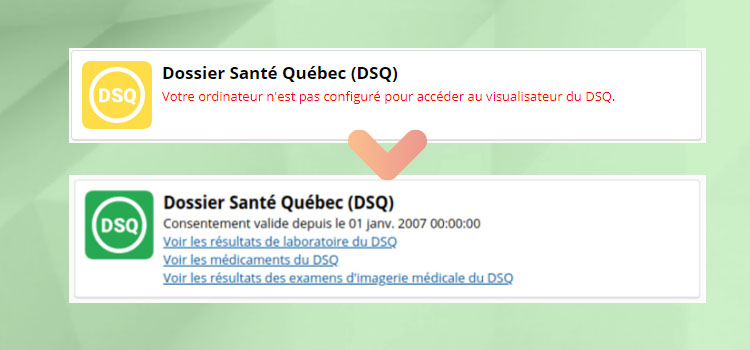
Once the installations are done, we invite you to consult the article View the patient's laboratory results available in the QHR in order to be able to properly start your use of this functionality.