
The Administrative center allows you to add the patient's contact info (phone numbers, email addresses, postal addresses) in order to be able to communicate with the patient.
Update the contact information
- Access the Administrative center.
- Click on Modify in the Contact information section.
- Click on the text field of your choice to edit it.
- To add additional information, click the + button on the right completely next to the section title.

- Click the button to the left of a phone number and drag that number to order the phone numbers. The display order identifies the patient's main phone number and selects the two phone numbers to display on patient documents (only the first two numbers are printed) and the clinical note print (only the first number is printed).

⚠️ Please note that the order selected will not be applied to the patient search result and in the schedule printout.
🖨️ Print phone numbers on documents
Here are the rules for displaying the two telephone numbers on the labels:
Phone #1:
- We use the displayed order if the contact info has been saved.
- We use the home number if it is present.
- We use the cellphone number if it is present.
Phone #2:
- We use the displayed order if the contact info has been saved.
- We use the work number if it is present.
When the patient does not have any home phone registered in the administrative center, we print the number associated with the "Cellphone", even if the field's title on the printed document is "Home".
Case examples:
- The patient has a home phone number and a cellphone number: the home number will be printed.
- The patient only has a cell phone: it will be printed in the phone fields even if the title is "Home", for example.
- The patient doesn't have a home phone but has a cellphone + the label you want to print contains a field for the home phone number and one for the cell phone: the cellphone number will be printed in both fields.
- The work phone number will never be impacted.
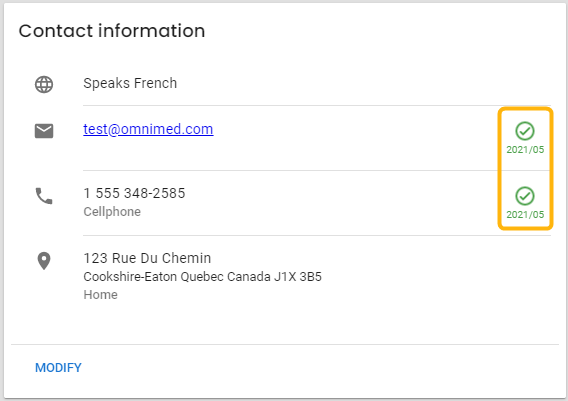
Contact information validation
In order to prevent data entry errors and to ensure that patient communications reach their recipient, a validation system is in place to confirm the validity of the cell phone number and email once the patient has already successfully received a document from Omnimed (e.g. sending a clinical tool by email or a PIN by SMS).
The date of validation is then displayed in the Administrative center and in the send to patient window prior to sending a clinical tool or SMS invitation to send photos to their record.
Delete contact information
In order to delete contact information, click on the X button located at the end of the appropriate contact information row, and click on Save.