
The configuration of the private billing module is a prerequisite to its use. The administrator account allows you to create one or more companies, manage products and product groups, as well as third party payers to meet the needs and preferences of each clinic.
Access private billing management
Companies management
Groups management
Products management
Third parties management
Access private billing management
- Access the administrator account.
⚠️Only designated people can use the administrator account. To do this, you must have access rights, which are given by Omnimed at the request of the clinic manager. - Click on Manage products and companies.

Companies management
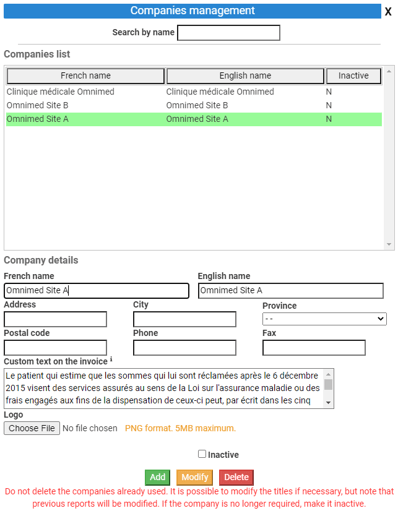
The Companies management tab at the top of the screen allows you to create, modify and remove companies. Billing by companies, i.e., sub-entities of an establishment, allows for an accounting breakdown of billable products/services as well as the invoices themselves.
Add a company
⚠️The creation of at least one company is required in order to set up on the invoice a logo and custom text. If no company is set up, only the name of your connection institution and its contact information will appear on the invoice.
From the Company details section:
1. Enter the French and English names of the company.
2. Add address, phone and fax numbers.
3. Indicate the closing date of the last accounting period if necessary.
This configuration locks invoices associated with a closed period, guaranteeing the integrity of financial data once the accounting period has ended. Only invoices from the current period can be modified or credited. Note that the service date now appears on the invoice, in addition to the billing date.
The closing date must be modified at the end of each accounting period. It cannot be configured in advance.
4. Add a custom text on the invoice (optional). This text is displayed at the bottom of the invoice. To display the text in more than one language, the translations must be added after the main text in this field.
This field can be used, among other things, to enter tax numbers, as well as the standardized text linked to the RAMQ: : "The patient who believes that the amounts billed after December 6th, 2015 are for services insured under the Health Insurance Act can, within five years of payment, make a written claim for reimbursement to the Régie de l’assurance maladie du Québec. When it is of the opinion that the amounts billed are not allowed, the Régie reimburses the patient and recovers the same amount from the professional or third party who billed for the services. "
5. Add the logo associated with the company on the invoice (optional). The logo must be in PNG format and the file size must be less than 5 Mb.
6. Click on the Add button.
Modify a company
- Select the company to modify from the Companies list section.
- Make the desired changes in the Company details section.
- Click on the Modify button.
Delete a company
- Select the company to delete from the Companies list section.
- Click on the Delete button.
⚠️ Deleting a company means deleting all product groups and products associated with it. It is recommended that you edit the associated product groups and change them to a different company before deleting a company.
Groups management
The Groups management tab at the top of the screen allows you to create, edit and remove product groups. A product group allows you to group similar products under the same entity. A product group can be associated with a company.
Add a product group
If you want the logo, the contact information and the custom text that you have configured in the company section to appear on the invoice, you must associate the group with the company. Otherwiser, the name and the address of the login insitution of the person creating the invoice will appear on it.
- Click on the Add button.

- Fill in the information at the bottom of the window.
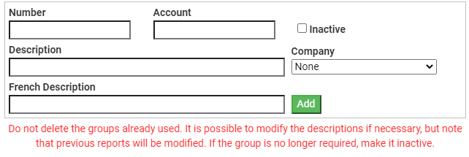
- Click on the Add button.
Modify a product group
- Click on the Modify button.

- Select a product group.
- Make the desired changes to the information at the bottom of the window.
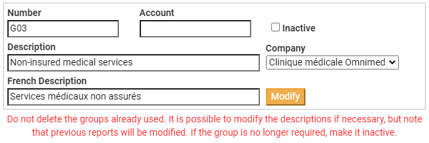
- Click on the Modify button.
Delete a product group
- Click on the Delete button.

- Select a product group.
- Click on the Delete button.
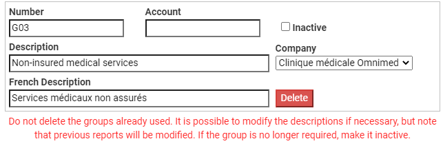
⚠️ Deleting a product group means deleting all products associated with it. It is recommended that associated products be modified and changed to another group before deleting a group.
Products management
The Products management tab at the top of the screen allows you to create, modify and remove products. The products represent the items, or services sold with its unit price. A product is a mandatory information to produce an invoice. It must be associated with a product group.
Add a product
- Click on the Add button.

- Fill in the information in the right section of the window. Enter:
- Code number
- French Description / Description
- Group (if applicable)
- Price
- GST / QST
- Variable price (price could then be changed directly on the invoice if needed)
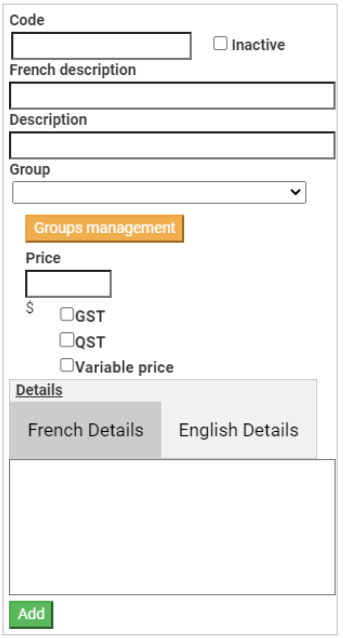
- Click on the Add button.
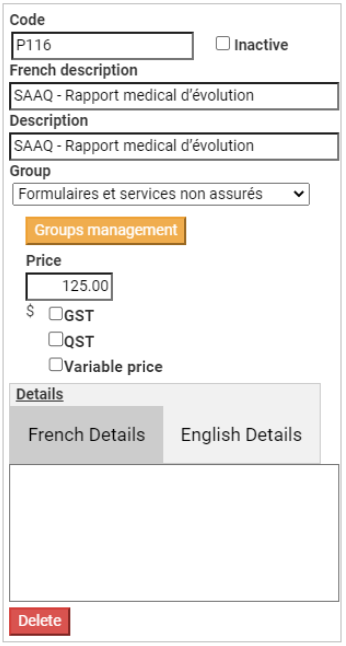
Modify a product
- Click on the Modify button.

- Select a product.
- Modify the information in the right section of the window:
- Code number
- French Description / Description
- Group (if applicable)
- Price
- GST / QST
- Variable price (price could then be changed directly on the invoice if needed)

- Click on the Modify button.
Delete a product
- Click on the Delete button.

- Select a product.
- Click on the Delete button and click Yes to confirm.
Third parties management
The Third parties management tab at the top of the screen allows you to create, edit and remove third parties. A third party payer is a person or company that is responsible for paying on behalf of the patient.
Add a third party payer
- Click on the Add button.

- Fill in the fields at the bottom of the window.

- Click on the Add button at the bottom of the window.
Modify a third party payer
- Click on the Modify button.

- In the list of third party payers, select the third party payer to modify.
- Modify the fields at the bottom of the window.

- Click on the Modify button at the bottom of the window.
Delete a third party payer
- Click on the Delete button.

- From the list of third party payers, select a third party payer.
- Click on Delete at the bottom of the window.

- Confirm the deletion.