
.png?width=688&height=321&name=Page%20nouvelle_trace%20rendez-vous%20annules_style%20photo%20v2%20(1).png)
The Cancel appointment feature currently completely deletes the appointment of the Appointment module, but it keeps a record of cancellations in the patient’s administrative centre.
Whether it's to investigate a cancelled appointment, analyse a patient's absenteeism or cancellation patterns, or to bill cancellation fees, if your clinic wants to maintain a record of the cancelled appointment, here is the alternative procedure to follow.
A. Prior configuration via the administrator account
B. Steps to follow 🎦 Watch the tutorial
If you do not need to keep track of cancelled appointments in the schedules, but would like to keep track of them in the patient's administrative center, you can use the cancel appointment button. Learn more.
Our team is currently working on this topic. Here are the developments planned for the end of 2024:
- Being able to filter schedules in order to see canceled appointments or not
- Allow patients to cancel appointments by themselves through the appointment reminder
A. Prior configuration via the administrator account :
Add a new appointment activity
- Access the administrator account.
- Click on Manage activies in the Appointment management section.
- Click on the + in the lower right corner.
- Complete the default information associated with the new activity:
- Colour - Select red
- Name - Enter Cancelled appointment (or any other name you like)
- Default appointment type - Select Other
Click Add to save the activity.

B. Steps to follow:

From the Display schedule details view
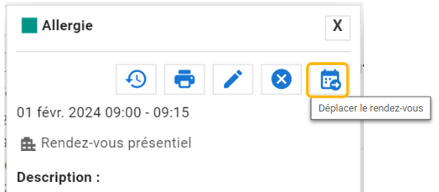
- Click on the appointment to access the details window.
- Click on the Move the appointment icon
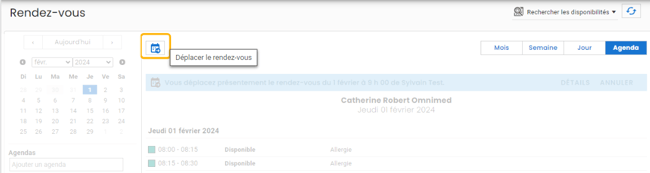
- In the view showing the next availabilities in the calendar, click again on the Move the appointment icon in the top left-hand corner:
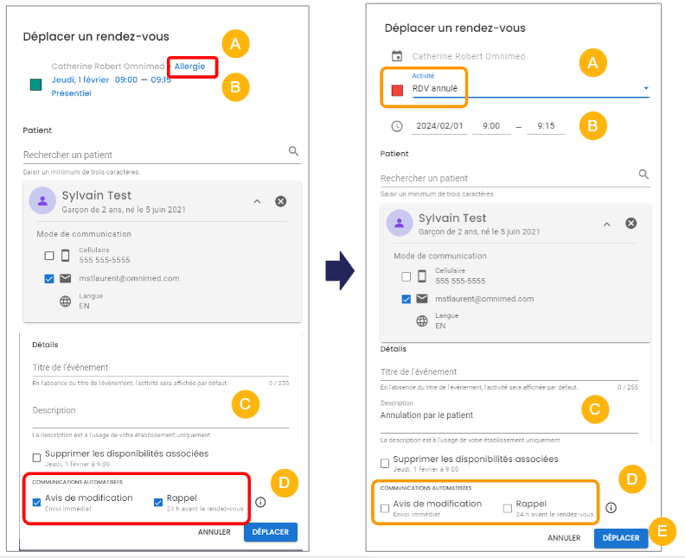
- In the Move an appointement window:
- Change the appointment activity to the new activity representing cancelled appointments
- Keep the appointment date and time (don't make any changes!)
- Add the reason for the cancellation in the Description if necessary
- Uncheck the boxes for automated communications (Modification notice and Reminder)
- Click on Move
The availability slot will then be freed up for another patient. The cancelled appointment will continue to appear in the user’s schedule:
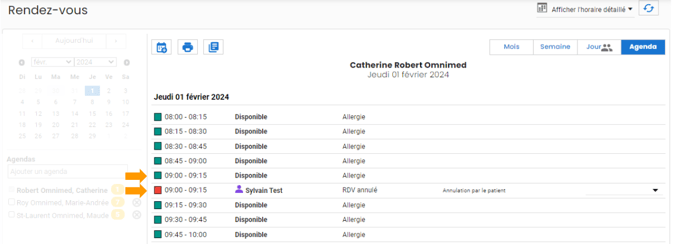
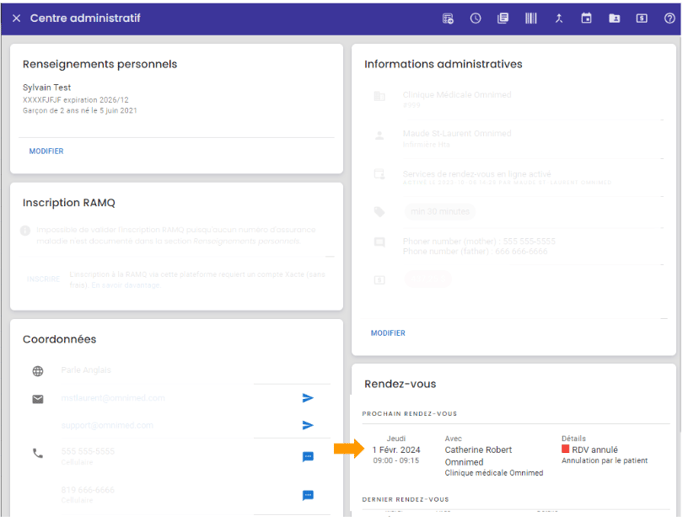
The appointment will also continue to be displayed in the patient's administrative centre:
Good to know :
- If you print labels from the Agenda view, labels will be printed for cancelled appointments too.
⚒️ Developments are planned to provide our users with a permanent standard procedure.